Create Bill
To create a Bill to a BIMoQ Project follow the steps:
- Make sure you are in the Edit Project Window.
- Click the '+' button next to
My Bills. - Select a Excel Document(.xlsx).
- The Select Excel Sheet window will open, allowing you to choose a worksheet from the selected document.
- Next, the Configure Bill Window will open.
- Assign First and last Row Range (Optional)
- Assign Columns for WBS, Description, Units, Quantities, Formula
- Click "Save".
Create a Bill.
Configure Bill Window
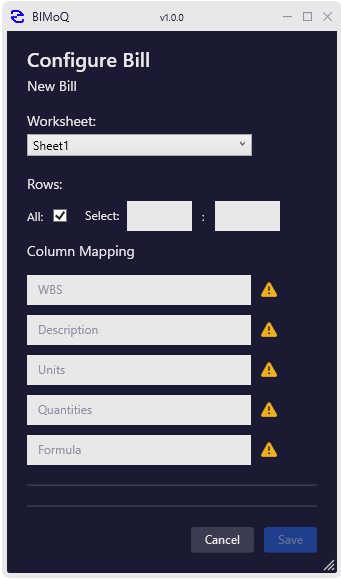
The Configure Bill window is where we set up how BIMoQ reads the selected Excel worksheet as a bill.
- Title: At the top of the window we can see the bill's name.
- Worksheet: A dropdown menu shows the worksheet we assigned to this spreadsheet. We can changed the selected spreadsheet later through this dropdown.
- Range: A worksheet can be broken up into multiple bills. We do this by setting a range: we input the start and end row of the worksheet area that we want to include in our bill.
- Column Mapping: In order to define a bill it is necessary to define the columns WBS, Description, Units, Quantities & Formula. We do this by typing the corresponding column name into each field.
After creating a bill, the Configure window remains accessible through the Configure button.
Tip
The Formula column is where we store information about how a quantity was calculated!