Calculate Quantities
BIMoQ connects your Revit models to your Excel bills.
Each Article in a Bill gets its quantity from the elements in the model, so it doesn't have to be measured and typed in by hand.
You calculate these quantities in the Article Window using Take-Off Sets, and the result is written into Excel.
You can always go back to the model and select the elements behind a quantity, so every figure in the Bill can be checked.
Article Window
The Article Window is where you work on a single Article of your Bill.
It shows which Article you are editing, the quantity currently written into Excel, and the Take-Off Sets that produce that quantity from your Revit model.
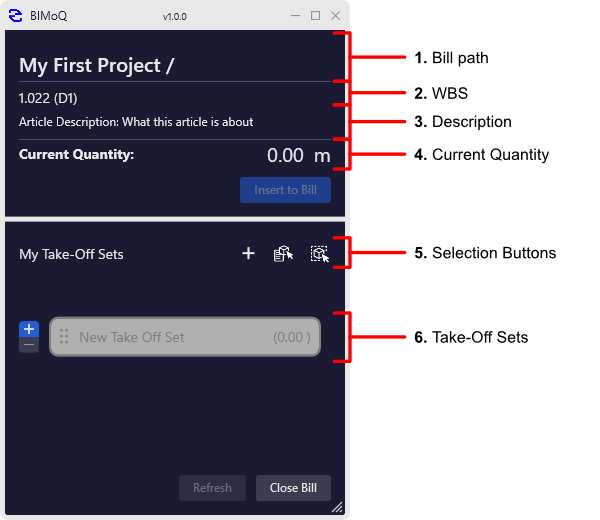
- Bill Path: Here we display the Bill's path.
- WBS: The selected Article's WBS.
- Description: The selected Article's Description.
- Current Quantity: The current quantity we have calculated and written into Excel.
- Selection Buttons: Allows selecting the Revit elements that correspond to the calculated quantities.
- Take-Off Sets: The list of Take-Off Sets assigned to this Article. Together they make up the Article's quantity. The '+/-' toggle next to a Take-Off Set determines if it's quantity will be added, or subtracted from the wuantities of the other Take-Off Sets in the Article. Right clicking on a Take-Off Set allows for renaming, changing it's color, or deleting it.
Take-Off Sets
A Take-Off Set is a rule that tells BIMoQ which elements to measure in the Revit model and how to measure them. For example, it could take the area of all walls of a given type, or count all doors on a level.
An Article can have one or more Take-Off Sets. Their results are combined into the Article's quantity, so a single Article can draw on different categories or types of elements. Each Take-Off Set can either add to or subtract from the total, for example to deduct openings from a wall area.
Because Take-Off Sets are stored with the Article, the quantity can be recalculated at any time. When the model changes, the Bill stays up to date without measuring again.
Take-Off Sets Window
The Take-Off Sets Window is where you create and edit a Take-Off Set. Here you define which model the set is calculating from, which elements the set includes and which value is taken from them, then save the set to the Article.
The window is broken up into three main sections:
-
Take-Off Models
-
Select Model Elements
-
Calculate Quantities
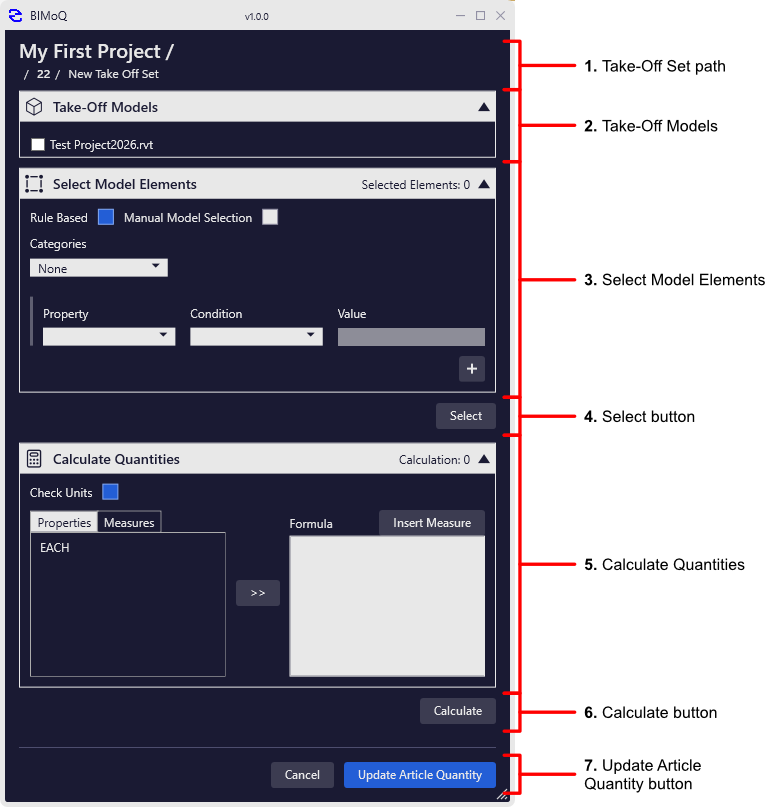
- Take-Off Set Path: Here we display the Set's path.
- Take-Off Models: In this section we have the list of the project's models, and can choose the model we want to calculate quantities from.
- Select Model Elements: In this section we define which elements of the chosen model the Set includes, by setting the criteria the elements must meet.
- Select Button: Selects the elements that match the criteria in Revit, so you can check that the Set includes the right elements before calculating.
- Calculate Quantities: In this section we choose which value is taken from the selected elements, such as their count, length, area or volume. In the Properties section you will see listed thw properties of the selected elements. These properties can be inserted into the Formula field. For more details on Properties, Measures, and the Formula field, see here.
- Calculate Button: Calculates the Set's quantity from the selected elements and displays the result. The calculated quantities will then be displayed at the top of the section.
- Update Article Quantity Button: Writes the calculated quantity to the Article, updating its quantity in the Excel Bill.
Properties
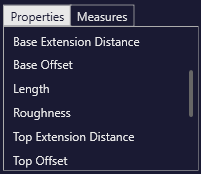
The Properties tab displays the properties of the selected elements, such as their parameters from Revit.
If the selected elements belong to different Revit categories, the tab will display only the properties that all of them share.
Clicking the '>>' button will insert the selected property into the Formula.
Tip
Searching: While hovering over the Properties tab, we can start typing to search for a specific Property.
Measures
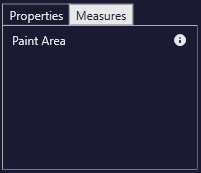
You will have noticed a second tab next to the Properties: the Measures tab.
Measures are special, calculated properties. They are designed to cover specific project needs, and help with calculating quantities that simple properties don't cover.
Unlike properties, which are read directly from the elements, a Measure is calculated by BIMoQ, often by combining information from several elements. For example, the Paint Area Measure calculates the area of the selected walls that faces into rooms, which is the area that needs painting. BIMoQ finds the room boundary segments formed by each wall and multiplies their length by the unbounded height of the related room. Doors and windows in the wall are excluded.
Measures are used in the same way as properties. Select a Measure and click the '>>' button to insert it into the Formula, where it can be combined with properties and numbers like any other value.
Tip
Hover over or click the ⓘ icon next to a Measure to see a description of what it calculates.
For now, all Measures are custom-made by the BIMoQ team. The list of available Measures will grow as new project needs are covered. Get in contact if you have the need for a specific measure.
A tool that will allow users to design their own measures is in the development roadmap.
Formula
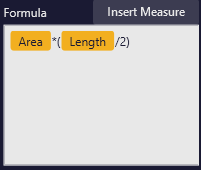
The Formula field defines how the Take-Off Set's quantity is calculated from the properties of the selected elements.
A formula can be as simple as a single property, for example an element's area, or it can combine several properties with numbers and arithmetic operators (+, -, *, /). For example, multiplying a wall's area by its thickness gives its volume.
Properties are added to the formula from the Properties tab using the '>>' button, so they are always written in the correct form.
Measures can also be added to the Formula.
When you click Calculate, the formula is evaluated for each selected element and the results are added together to give the Set's quantity.